Model 18 norton 1938
Finished ! a big word when we are talking motorcycle restoration ,a term I like is practical completion because once a bike is registered and running, the terrible temptation is to ride it and enjoy it . I am claiming that this one is my third restoration or rebuild, the others being a swing arm 500 Ajay then the 1970 Commando and a Model 7 500 Domi .This Norton is based on a 16H military frame and little else from a 16 H .It has occupied my mind and hands for years ,the terrible decision between the high or the low exhaust ,which would look best ? which would look original ? which would I like best ?.Would I go high system with the exhaust I had ,or should I put a low pipe and a brooklands can on it ? I would debate these issues late at night with an empty beer bottle, and after waking at 2.30 am, some times on e bay I would spy a part and think yes ! then I would go cold on the idea . Finally I jumped and ordered a engine pipe from the UK for a 500 T thinking this is my Christmas present to myself for Christmas 2014 , happy Christmas Norton . This outlines my decision making process for the myriad decisions I made along the way ,after thumbing through the pictures in Roy Bacons book, Norton Singles , Ijust loved the low slung look of the pre war Nortons, low seat, girder forks, thin tank, dolls head gearbox , two stay rigid frame, very low ground clearance ,the oil tank the mudguards the whole motorcycle, lock stock and barrel, I just have to build one of these .
Where to start? well a frame is the usual kick off point, but I started with the gearbox while searching for a frame, eventually I got one, I had most of a model 19 bottom end and started looking for the rest ,forks Indian repro bought second hand and so on . As a matter of fact I've decided to list where I got some of the bits from
Frame, rocker box and spacers, finger followers, cams Tasmania e bay
Crankcases and covers Sydney e bay
Flywheel Spotswood
Big end bearing Norvil
Small end bush Bendigo swap
Piston gudgeon and rings JP pistons Adelaide
Valves ,collets ,springs and guides Norvil UK
Valve spring collars home made
Cylinder head
Cylinder barrel sleeve and hone Western District Vic contacts
Cylinder Barrel Bendigo Swap
Push rods and covers home made SS Dural
Gear box case Perth e bay
Gear box covers and mech Brisbane e bay
Gear box guts Who knows ?
Primary cases Swap meets
Clutch Swap meet and bits
Front 21 alloy rim Bendigo swap
Rear 19 alloy rim Off my Commando
Frony hub e bay
Rear hub Spotswood Vic
Magneto clockwise camplate Sydney
Carbi from bits
Exhaust header Feked UK
Muffler Bendigo swap
Seat Ballarat Swap
Front guard Ballarat Swap Adam Higgins
Rear guard Swap meeting ?
Mudguard stays home made
Axles spacers bolts nuts and washers home made
Speedo cable and drive , India e bay
Stainless spokes Feked and trulind
Friction washers fork, rear stand spring
and lots of special bits BMH Trading Brisbane
rear stand Bendigo Swap
Tail light Ballarat Swap
Battery box Home made
Battery case E bay UK
Headlight 8 inch Swap with mate AF
This list give a picture of where the bits can come from
79X100 NORTON RESTORATION AND RIDE
Tuesday 8 December 2015
Sunday 6 December 2015
Norton Model 18 project complete !
Well complete is a big word, but this probably as close as it gets .I,ll stick up some pics and some titles as well.I have no idea what this restoration cost and I suppose about three years of chasing parts and to be honest its a little disappointing when they are finished ,still I have other projects to start and to finish .
 Typical view drive side
REAR TIMING SIDE
 I kind of like these pics from an angle at the rear and looking down .This shows a second hand muffler from one of the swap meetings the new K70 Dunlop rear tyre and the old style number plate bracket this one should have the tail light centred in a projection on the right hand top corner ,if I pick up the correct one Ill swap them over .
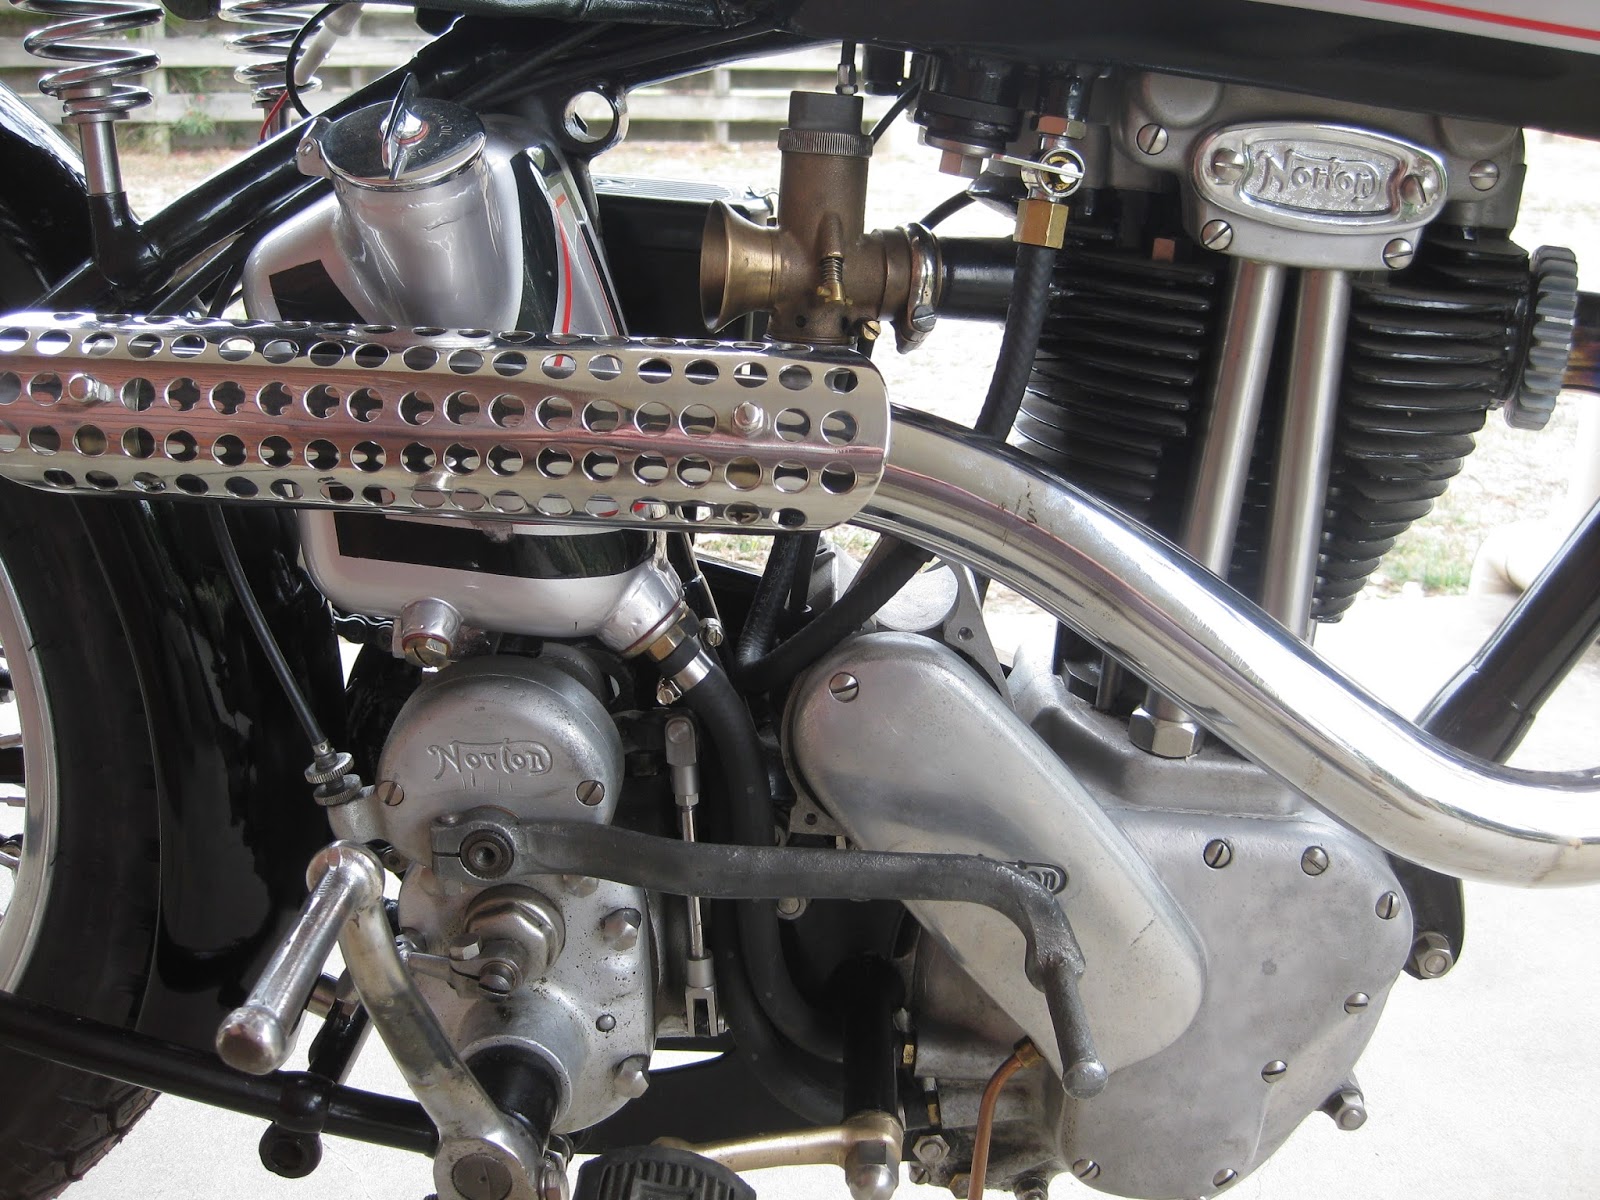
 The drive side shows MO1 maggy this one has to be a clockwise one, hard to find for sure , well actually you just need a cam plate that is a clockwise one ,hours of work have gone into the chain cases, they always seem to be badly knocked about, some by having a primary chain derailed inside . The old style battery cases are a bit more expensive than the later ones I got this one from the UK can't remember the company . You may notice the footrest cranks cast in bronze by Manx Classic Spares I thought they looked so good I didn't bother with the black paint they won't rust either .
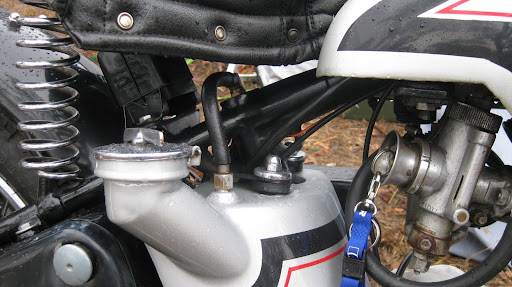
 This is the pretty side of most bikes , all that polished alloy ,what a bastard to clean ! all those nooks and crannies with split pins poking out to rip at your hands .This is the famous Dolls Head gearbox that evolved into the AMC unit by the middle fifties the gears in this box are generally the same as the later lay down box the three bearings are interchangeable with their counterpart in the last 850 Commando and I think the lay shaft fits too although I believe the later ones are stronger .The gears fitted to the AMC box have a different profile and are not compatible with the earlier ones .Pre dolls head boxes [Sturmey Archer] have gears marked EIV the dolls head lay down have gears marked with a N8000 number that is the part number like N8043 and the AMC gears are often stamped AH also some have a lathe ring through the dogs The exhaust was purchased from Feked in the UK its actually a 500 T part that fitted up nicely
 FRONT END
Indian copy of Webb girders 1950's hub laced into dunlop 21 inch mudcatcher rim with stainless spokes .Just fitted a new Avon rib tyre , the mud guard was made by Adam Higgins [THE EARLY YEARS] who can make anything you want he's at the Ballarat and Bendigo swaps his phone number is 03 5148 3207 This guy is an artisan and very well priced .I had to extend the brake lever and make up a heap of spacers to centre the wheel in the forks .The original would have had the QD brake and hub set which is much wider ,Norton did fit a one piece hub/brake before the war but only in the Inters and some ES2's and would have been combined with a cradle frame .The the clunkers were left with the open diamond frame the tractor mudguards the square oil tanks and the wide girders
 j
j
 BACK END
I managed to find the correct cotton reel hub a new sprocket and the correct brake plate. I pulled this alloy rim off my Commando and replaced it with a SS item ,home made chain guard mudguard stays repro rear stand from Rod [Portland ] and repro number plate bracket original lucas tail light actually still had olive drab paint on it .

HOW DO YOU ROTATE A PIC ????
Can't work out how to rotate this pic ,I found this transfer and thought it would look good on the tank ,I have no idea where they should be placed or on what model .The work on the tank was really an experiment because the primer /filler is a 2 pac paint .I then picked a colour that was a acrylic [Jaguar silver metalic ] then put the stickers on and put a 2 pac clear over the lot .I was expecting all sorts of trouble but it appears these products are compatible
 RIDERS VIEW


REAR TIMING SIDE


Indian copy of Webb girders 1950's hub laced into dunlop 21 inch mudcatcher rim with stainless spokes .Just fitted a new Avon rib tyre , the mud guard was made by Adam Higgins [THE EARLY YEARS] who can make anything you want he's at the Ballarat and Bendigo swaps his phone number is 03 5148 3207 This guy is an artisan and very well priced .I had to extend the brake lever and make up a heap of spacers to centre the wheel in the forks .The original would have had the QD brake and hub set which is much wider ,Norton did fit a one piece hub/brake before the war but only in the Inters and some ES2's and would have been combined with a cradle frame .The the clunkers were left with the open diamond frame the tractor mudguards the square oil tanks and the wide girders


I managed to find the correct cotton reel hub a new sprocket and the correct brake plate. I pulled this alloy rim off my Commando and replaced it with a SS item ,home made chain guard mudguard stays repro rear stand from Rod [Portland ] and repro number plate bracket original lucas tail light actually still had olive drab paint on it .

HOW DO YOU ROTATE A PIC ????
Can't work out how to rotate this pic ,I found this transfer and thought it would look good on the tank ,I have no idea where they should be placed or on what model .The work on the tank was really an experiment because the primer /filler is a 2 pac paint .I then picked a colour that was a acrylic [Jaguar silver metalic ] then put the stickers on and put a 2 pac clear over the lot .I was expecting all sorts of trouble but it appears these products are compatible


Tuesday 18 November 2014
Norton 1938 Model 18
Slowly but surely the restoration is comeing to an end , I have experimented with paint, transfers and pinstripes and now know that I can spray two pac over acrylic ,apply the transfers / stichers and then over coat the lot with a two pac clear , unfortunatly I have a bit to learn about masking , but I should get it right next time .
The motor has now been bolted up after fitting a very good used big end bearing, three new main rollers a new small end bush new piston rings and gudgeon from JP in Adelaide , cylinder resleeved to standard bore . New valves , guides and springs from Norvil .I reseated the valves and made new spring retainers from 4140 all nuts studs screws and washers I re made in stainless with the exception of the head studs . The next job is to get some 2023 aluminium 10 mm tube or some 4140 and make the push rods , order a pipe from Feked in the UK and then I'm ready for a start ? fit a chain and I'm ready for a ride .


Friday 6 December 2013
Norton Model 18 " looking better "
At last it looks like a bike ! the main difference being the wheels , in the last post I had the hubs and brakes sorted but no rims . I was in the fortunate position of having bought a 21 " alloy rim at the Bendigo swap two years ago and having a 19 " alloy rim on the front of my Commando, so I ordered a new 19 " stainless rim and stainless spoke sets for the front and back of the model 18 . I fitted the new SS rim with a good set of zinc spokes onto the Commando and spoked up both alloys with the SS spokes, I had a hiccup with spoke lengths [ my fault ] and had to get 10 more spokes 10 mm longer than the ones I had , Fastline Spokes in Broadford were great and had ten custom made and delivered in less than a week ! Fastline spokes is run by Bruce Lotherington phone 0411844169 or e- mail fastline7@bigpond.com


 From the back fitted up with 40 year old tyres to keep it off the ground , these will need to be replaced before the red plates go on , not painted as yet the rear guard and stays have been fitted up and removed for paint the seat is another treasure from last years Ballarat swap its a middle size frame and came with a grey vinyl cover in rather good nick I'll dye it black and have a look at it then . I recently rang another Norton man in Tassie looking for parts and realised that I had got from Steve the frame ,a brake drum ,crank pinion , rocker box , push rod tubes and gland nuts and some more bits I've forgotten forks from Canberra gearbox shell from Perth bottom end Sydney tank from up on the Murray , could think of this as a "interstate " The bottom end has been interesting to say the least , the cases I am using are stamped 1937 on the inside in small letters and on the outside are stamped 82 x 113 and the serial number on the other side ,they came with a steel crank and 7 1/2 " conrod , but I will be using a pair of cast iron wheels and 7 " rod from a 490 cc motor .The timing chest cover that I will use is actually a 1938 or 39 as it has no oil pressure tell tale and the timing cover has 3 screws and no oval ridge ,I think Norton ran tell tale and ridged cover with 2 screws until 1937 and then changed over . I might add that the cover in the pic is not the one I will use ,it is a 3 screw cover but has the tell tale as well , who knows if there was a model with ridged cover that had 3 screws ???
Sunday 27 January 2013
Norton Model 18 Restoration
The model 19 project has now become a model 18 ,mainly because of two factors, firstly it seems to be very difficult to flush out parts for these 596 cc motors and secondly I have found out that the motor will be too tall [ thanks Marcus ] for the WD open diamond frame, as a matter of fact it may well be a tight fit with the 490 cc motor .I know of a civilian open diamond frame with a 500 T motor fitted to it ,but there are differences between the two frames . So I will now refer to this restoration as a model 18 ,I posted a few pics when the frame and forks were in primer so as you can see I have moved forward a bit.

I was convinced to try using a two pac paint on the frame and forks as I am told it has a better resistance to fuel spillage ,I suppose I'll find out later ,in the past I have used enamel bought by the litre at the paint shop, pressure pac enamel , high temp pressure pac and acrylic so I have a bit of a mix certainly don't use the enamel pressure pacs they wash off with petrol .
aa
 The wide girder forks are designed to take the QD hubs of which I cannot find anywhere so I decided to fit a later model hub to the front end .This required three bits of engineering firstly make an axle out of 304 stainless with spacers nuts and washers to bring the wheel centre in the forks .Secondly I repeated the treatment of the Domi and replaced the RH wheel bearing with a sealed bearing and then removed the seal from the hub side only then I shortened the bearing spacer by about 4 mm , this allows the double row ball to slide in enough to fit a garter seal to the LHS of the hub, the seal was 40 x 25x 7 mm so now the brake plate spacer has moved in and the plate is scraping so I then turned up a new spacer with the 4 mm added to its length and created a polished 25 mm diameter for the seal to contact , I now expect that the grease will stay in the hub and not on the brake shoes .Lastly the brake torque bracket had to be fabricated and fitted to the back plate , the back plate was a roadholder type with one of the pivots extended to engage a slot in the fork leg ,so I drilled out one and unbolted the other , turned up two new pivots with rivet ends and riveted the torque bracket on as per original .
 The tank repairs are under way , my nephew did the welding as " a mans got to know his limitations ".
 The oil tank mounts , once again not the correct tank but it looks great and can be made to fit ,this tank is off a later model that has been fitted with a lay down gearbox , I ground the welds and removed the original bracket and made a new setup to get the clearances right from the frame . This tank has a rounded front , the correct item is rather squared off
 The forks , these are Indian made which I bought off e bay for about half what the Indians want for them .I think the original buyer was probably disappointed with the quality and was able to find something better .I started by stripping them down and working with die grinder, files and emery tape and tidying up all the castings then body filler and spot putty .I managed to get steering damper friction discs from BMH trading [ see my favourites list ] and made new serrated washers and pins for the check springs out of stainless , still looking for 18 mm hex to replace the rest of the nuts .The work continues , if I hit a problem in one area I start on another bit , next is to get a spoke set and have a go at lacing the front wheel. my hold up items are a QD hud for the rear , a rear stand and rear chain guard and enough bits to make a clockwise maggy .
More later , next post Ballarat Swap Meeting

I was convinced to try using a two pac paint on the frame and forks as I am told it has a better resistance to fuel spillage ,I suppose I'll find out later ,in the past I have used enamel bought by the litre at the paint shop, pressure pac enamel , high temp pressure pac and acrylic so I have a bit of a mix certainly don't use the enamel pressure pacs they wash off with petrol .
aa


More later , next post Ballarat Swap Meeting
Wednesday 26 December 2012
Deane Rotary Valve Prototype
While investigating the myriad of machinery at the last Lake Goldsmith Steam and Traction Engine Rally I came across a display and running prototype of the Deane Spherical Rotary Valve fitted to a pre war Norton 16 H bottom end and installed in a ES2 garden gate frame .
I have included a pic of a newspaper article that explains a few of the design features , inventors being inventive have experimented with valve gear for sometime , I believe one motorcycle maker produced a sleeve valve motor with a liner inside the bore which moved up and down by way of a cam to get the ports to coincide ,we see side valve ,overhead valve ,inlet over exhaust [harley and land rover] over head camshaft , DOHC , triple OHC [7R 3A AJS ] desmodronic valves and in two stroke motors we have piston valve and disc valve assisted by reeds and other stuff .
 In the case of four stroke motors the idea is to reduce reciprocating weight in the valve train, as when anything moves in one direction and then has to be reversed it must come to a stop, and to get it moving again requires the greater energy investment [ greatest rate of change ]. Reduction of reciprocating weight is the object of the designers and also simplification of the engine will help in lots of ways these principles apply to suspension components too.Interesting to consider the design of the Wankel rotary and a design by the Australian Ralph Sarich
This motor has been in storage for decades and been assembled into a frame so the general public can experience the creativity of the inventors , a quick look on google shows William Ronald Deane holds US patent 3730161 filed May 28 1971 . I seem to remember a rotary valve design fitted to another Norton shown in Roy Bacons book Norton Singles but this differs in that the Deane valve is a sphere fitted with rings that are pegged to prevent rotation and snap offs in the ports [ just like two strokes ] I had a chat with the guys that did all the spanner work and they didn't think the motor produced any more power than the 16 H , it started first kick every time and sat and idled beautifully . The cylinder had been made from a compressor cylinder and the head is machined from solid, what kind of steel? I don't know , I think the text says the valve rotates at one quarter crank speed and the chain drive comes off the vestigial camshaft and th
 e last reduction would be on the two sprockets .
All in all this is an amazing exhibit and drew a lot of attention from the more technical minded punters at the rally, the inventors also made a head to suit a small honda single but no one seems to know where its gone, perhaps Harold Holt had it under his arm when he swam off to that Russian sub or will it turn up on a lawn mower one day ? better check your shed !
Click on the print to blow it up big enough to read
 a
a
a

I have included a pic of a newspaper article that explains a few of the design features , inventors being inventive have experimented with valve gear for sometime , I believe one motorcycle maker produced a sleeve valve motor with a liner inside the bore which moved up and down by way of a cam to get the ports to coincide ,we see side valve ,overhead valve ,inlet over exhaust [harley and land rover] over head camshaft , DOHC , triple OHC [7R 3A AJS ] desmodronic valves and in two stroke motors we have piston valve and disc valve assisted by reeds and other stuff .

This motor has been in storage for decades and been assembled into a frame so the general public can experience the creativity of the inventors , a quick look on google shows William Ronald Deane holds US patent 3730161 filed May 28 1971 . I seem to remember a rotary valve design fitted to another Norton shown in Roy Bacons book Norton Singles but this differs in that the Deane valve is a sphere fitted with rings that are pegged to prevent rotation and snap offs in the ports [ just like two strokes ] I had a chat with the guys that did all the spanner work and they didn't think the motor produced any more power than the 16 H , it started first kick every time and sat and idled beautifully . The cylinder had been made from a compressor cylinder and the head is machined from solid, what kind of steel? I don't know , I think the text says the valve rotates at one quarter crank speed and the chain drive comes off the vestigial camshaft and th

All in all this is an amazing exhibit and drew a lot of attention from the more technical minded punters at the rally, the inventors also made a head to suit a small honda single but no one seems to know where its gone, perhaps Harold Holt had it under his arm when he swam off to that Russian sub or will it turn up on a lawn mower one day ? better check your shed !
Click on the print to blow it up big enough to read

a

Wednesday 28 November 2012
Swap Meet Buggies
On a previous post I wrote about the good old days [ before Insurance Company Liability ] when the talent and imagination of the Swap Meet Junkie could be displayed at the meeting by way of a motorised shopping trollie / esky on wheels . Who needs a buggie ? you say, well ,if you find a set of tyres for that Morris Minor or even a bottom end for a Beeza, you are gunna need a buggie of some sort to get the treasure back to the carpark, and that might be a long haul . You could make a couple of trips back to the ute but think of all the rare bits that have been snapped up by dealers and sent overseas while you dither ferrying the gold to the car , you need a buggie to suit you own collecting style and volume , where to start ? Hell we're gunna do what all the bike manufactures did before the design stage , we'll take a good look at whats out there , pick the best points, trash the bad bits, produce an economical prototype and do the on ground testing . John 'O' Groats to Lands End and 50 laps of Brooklands .That should do the trick , now check out the sly pics I took while working under cover at the last Bendigo Swap Meeting around 17 th November so this stuff is state of the art, none of your old technology here . Click on the pics to blow them up

This was the only motorised cart I saw at Bendigo this year and the organisers would only have allowed it because the owner had one prosthetic leg . I can't remember the details of the prime mover but you can see the rear slicks and that the trailer is single axle , what a shame they banned these rigs as they contributed to the feel of the meeting so much .
 This guy's in a hurry , basic format is a dragster typerfied by large slicks at rear, narrow disc wheels on the front , curious transverse front suspension, T model Ford style and using non stressed mild steel body [ this could lead to failure at extreme speed ] His treasure is a 1950's style radio and some other junk I can't make out .
 The most common type of buggie [bag trollie BT ], this one with folding frame finished in red oxide primer [rarely seen these days ] and inflateable tyres ,its got that home made look to it .Note the tub is the type bought at K mart or others ,as in the past the Sherrif has been patroling the swaps policing the theft of milk crates. I'd like a commission for every record collection that is stored in a milk crate
 This is a blast from the past , not a purpose made ,swap meet buggie {SWB] at all but is in fact a trailer designed to attach to the carrier of a push bike .
Main construction packing case tray, pram wheels on pram axle and 1/2 inch GWIP drawbar / handle note tray is a stressed member , this unit would be hard work in the loose granitic sand that had been spread over much of the grounds .Looks like he's scored a second WW gerry can and is hiding more stuff under a briquette bag ...
wonder what it is ?
 Another variation of the BT with a different tray , stackable with slots mouled into the sides , perhaps pinched from a greengrocer or a fishmonger .This guy has hooked his backpack on the SWB and is towing rather than pushing, a risky practice as treasure could be borrowed and not returned
 The white paper rectangle displays the price $ 2500.00
A Tardis [ T ] best way ever to get the parts home
 Recycling at its best ,the tips are full of bike parts and these big wheels are just the ticket for soft sand and pot holes
 Another BT based cart using a cherry barrel for the tub QD provided by baler twine ligatures and occa strap hold down . This unit is eco friendly [ EF ]and will contain oil spills from gearboxes bottom ends and primary drives .
The writing is on the wall and soon all SWB's will have to be certified as EF
 BT fitted with sturdy home made tray looks like seat height , interesting box, nine out of ten blokes would have the tray side boards horizontal rather than vertical .This is the only SWB that had a lid .
 A veritable work of art.... rickshaw standing on rear end , this was parked and although I waited some time did not get a dynanic shot .Note push bike wheels and red and green trim this could indicate traditional Chinese colours or the with Christmas so close the colours of holly
 Thinking laterally , double decker stock crate four wheel unit ,small esky on the bottom in the shade all the junk up top .Lets not kid ourselves this is a laundry cart and would never take the weight of say a GoldWing side cover ,this bloke needs to go back to the shed and take a good look at himself
Note far left Stolen Milk Crate SMC grey plastic property of Polar Milk Company
 The low volume of this cart will limit this guy's shopping
 This one reminds me of my tool box not sure if you would push this unit or pull it
There you have it ! now you are armed with the design variation and lots background, so get out in that shed get down to the tip" keep your eyes wide the chance won't come again " grab the bits and get welding, Ballarat Swap last weekend in February and don't think you'll get a SWB up and running before Christmas .I want to see more original Stuff out there here's some pearls for free.
Stop lights Radio Sunshades number plates EPIRB suspension brakes
Next post Deane rotary valve prototype fitted to a 16H bottom end and mounted in garden gate norton frame this post will not be a joke

This was the only motorised cart I saw at Bendigo this year and the organisers would only have allowed it because the owner had one prosthetic leg . I can't remember the details of the prime mover but you can see the rear slicks and that the trailer is single axle , what a shame they banned these rigs as they contributed to the feel of the meeting so much .


Main construction packing case tray, pram wheels on pram axle and 1/2 inch GWIP drawbar / handle note tray is a stressed member , this unit would be hard work in the loose granitic sand that had been spread over much of the grounds .Looks like he's scored a second WW gerry can and is hiding more stuff under a briquette bag ...
wonder what it is ?


A Tardis [ T ] best way ever to get the parts home


The writing is on the wall and soon all SWB's will have to be certified as EF


Note far left Stolen Milk Crate SMC grey plastic property of Polar Milk Company


There you have it ! now you are armed with the design variation and lots background, so get out in that shed get down to the tip" keep your eyes wide the chance won't come again " grab the bits and get welding, Ballarat Swap last weekend in February and don't think you'll get a SWB up and running before Christmas .I want to see more original Stuff out there here's some pearls for free.
Stop lights Radio Sunshades number plates EPIRB suspension brakes
Next post Deane rotary valve prototype fitted to a 16H bottom end and mounted in garden gate norton frame this post will not be a joke
Subscribe to:
Posts (Atom)